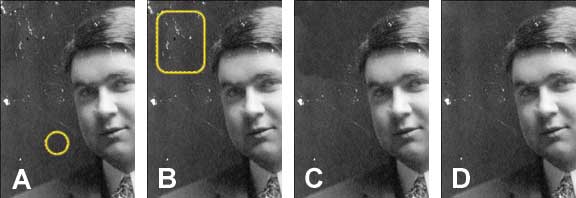
You probably have used the Stamp Clone Tool (S) to repair flaws in an image; however, Photoshop CS has two tools that do much better to help you repair a damaged image, the Healing Brush Tool (J) and Patch Tool (J). When touching up dust specks, scratches and other blemishes these two tools are far easier to use. What makes these tools more useful is the fact that they match the texture, lighting, transparency, and shading detail of the sample pixels to the source pixels.
A. Sample pixels good area of the image.
B. Target area to correct (using the source pixels).
C. Correction using Stamp Clone Tool (S) - Sample pixels were darker and so they do not match the target area and leave an undesirable blotchy appearance.
D. Correction using the Healing Brush Tool (J) - Sample pixels were matched to the source pixels, which makes for a smoother and more consistent repair.
Healing Brush Tool (Adobe Photoshop Instructions)
- Select the Healing Brush Tool (J) from the toolbox.
- Adjust the brush size to fit the size of the speck or scratch. Press the "[" key to decrease the brush size or press the "]" key to increase the brush size. You can adjust the brush size and style in the Brush pop-up palette in the option bar at the top of the work area.
- The Mode should be set to Normal and the Source should be set to Sampled.
- Select Aligned in the options bar to sample pixels continuously, without losing the current sampling point, even if you release the mouse button. Deselect Aligned to continue to use the sampled pixels from the initial sampling point each time you stop and resume painting.
- Select Use All Layers in the options bar to sample data from all visible layers. Deselect Use All Layers to sample only from the active layer.
- Option-click (Mac OS) or Alt-click (Windows) an area of the image that you want to use as a touch-up sample start point. This will then be target area as a model for the area you want to repair. Release the Option or Alt key.
- You can either drag across the area you want to touch up or single-click on specific specs to gradually repair the image. A plus sign appears over the area Photoshop is using as the touch up sample. When you finish the touch up, Photoshop calculates the correct amount of healing.
Click here to view a QuickTime Movie that shows this procedure. (There is no sound with this movie.) Requires QuickTime.
Adobe Photoshop Tip: If you are retouching a portrait, your corrections will seem more realistic if you duplicate the original image layer and make all adjustments on the new layer. Gradually reduce the opacity of the touch-up layer until some of the subject's character lines and wrinkles show through.

