Checking the accuracy of your plate ablation (laser imaging) is an important component to quality control in the plate room. It is a relatively simple check, and the only required equipment is a calibrated transmission densitometer (also, a 100x microscope is helpful for inspection, if available). Remember, always consult an experienced professional before changing settings or making any adjustments to your laser imaging device.
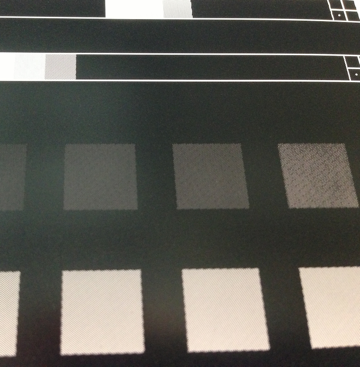
Step #1: Create your control target. You'll need to rip a test file containing 3 patches, no smaller than the aperture of your densitometer. 1%, 50%, and 100% patches on the target. LPIs between 133 and 175 work well. NO CURVE APPLIED - this is very important - Linear, please!Step #2: Image this target on your plate, in the same place, twice. Yes, exactly overlapping. This will ensure that the 100% patch is completely free of any carbon mask. This double-ablated patch will be the zero-point for your densitometer. Mark this patch with a zero on the plate to remember that it is the zero-point.
Step #3: Image the same target in a new location on the plate, once only. This will be the patch that you'll read to determine the laser ablation status.
Step #4: Remove the plate (handle carefully to avoid mask damage) and zero the densitometer on the "zero" marked 100% patch. Read this patch to confirm zero.
Step #5: Taking the readings
Stain Test (100% patch): Read the 100% patch on the single-ablated target. The maximum allowed density is 0.06. Anything above this is considered out of spec. After taking this reading, zero the densitometer to this patch before taking the 50% reading.
Power Test (50% patch): Read the 50% patch after zeroing to 100% stain patch. The reading should be between 0.28 – 0.32. Anything above or below this range may indicate a power setting issue.
Rough Focus Test (1% patch): This is a simple, rough test to check that your laser is generally in focus. You should be able to see dots in the mask under magnification (100x recommended). If no dots are seen in this patch, it could be a sign of a focus issue or power setting issue.
So, why not create a small target that can be imaged on the waste area of a plate, daily or weekly, to check the laser status? It's a small step to catch a problem that could potentially cause big headaches if left unchecked. If you have any questions about this process, or creating the proper ripped targets, contact APR's tech team. We are experienced in this procedure and are glad to help.

 Checking the accuracy of your plate ablation (laser imaging) is an important component to quality control in the plate room. It is a relatively simple check, and the only required equipment is a calibrated transmission densitometer (also, a 100x microscope is helpful for inspection, if available). Remember, always consult an experienced professional before changing settings or making any adjustments to your laser imaging device.
Step #1: Create your control target. You'll need to rip a test file containing 3 patches, no smaller than the aperture of your densitometer. 1%, 50%, and 100% patches on the target. LPIs between 133 and 175 work well. NO CURVE APPLIED - this is very important - Linear, please!
Step #2: Image this target on your plate, in the same place, twice. Yes, exactly overlapping. This will ensure that the 100% patch is completely free of any carbon mask. This double-ablated patch will be the zero-point for your densitometer. Mark this patch with a zero on the plate to remember that it is the zero-point.
Step #3: Image the same target in a new location on the plate, once only. This will be the patch that you'll read to determine the laser ablation status.
Step #4: Remove the plate (handle carefully to avoid mask damage) and zero the densitometer on the "zero" marked 100% patch. Read this patch to confirm zero.
Step #5: Taking the readings
Checking the accuracy of your plate ablation (laser imaging) is an important component to quality control in the plate room. It is a relatively simple check, and the only required equipment is a calibrated transmission densitometer (also, a 100x microscope is helpful for inspection, if available). Remember, always consult an experienced professional before changing settings or making any adjustments to your laser imaging device.
Step #1: Create your control target. You'll need to rip a test file containing 3 patches, no smaller than the aperture of your densitometer. 1%, 50%, and 100% patches on the target. LPIs between 133 and 175 work well. NO CURVE APPLIED - this is very important - Linear, please!
Step #2: Image this target on your plate, in the same place, twice. Yes, exactly overlapping. This will ensure that the 100% patch is completely free of any carbon mask. This double-ablated patch will be the zero-point for your densitometer. Mark this patch with a zero on the plate to remember that it is the zero-point.
Step #3: Image the same target in a new location on the plate, once only. This will be the patch that you'll read to determine the laser ablation status.
Step #4: Remove the plate (handle carefully to avoid mask damage) and zero the densitometer on the "zero" marked 100% patch. Read this patch to confirm zero.
Step #5: Taking the readings