
How to Make Precise Flexo Plate End Butt-Joints for Continuous Images
Submitted By Frank Burgos, Flexoexchange.com
Once in a while a customer requests a print job consisting of at least one continuous image or background color that cannot be printed via simple flood-coating with a tint roller. Gift wrapping paper, as one example, often has at least one continuous background color with design elements dropped out throughout. Wallpaper and banners are other products often calling for continuous print, and most of you have probably seen at least one situation where the ability to print a seamless image was critical to ensure a quality product. Using a regular flexo plate to print such a job would result in a gap or seam where the plate's ends butt up against each other, which would show up in the printed product.
Laser engraved rubber print sleeves or rollers, or photopolymer sleeves may be employed to print continuous images. Either flexographic method prints high-quality continuous images or background colors seamlessly, making them the method of choice for demanding print jobs. The laser engraving of rubber print rollers has been around for many years, and photopolymer plate manufacturers are developing sleeve plates that are continuous and exposed in the round. It seems we have ways of getting it done.
So, in an ideal world, we'd use photopolymer sleeves or laser-engraved print rollers whenever a continuous print job came up. However, doing so can introduce new challenges to our workflow. As sleeves and rollers are usually outsourced, plate delivery time or delays resulting from plate defects, plate wear, or damage can pose problems. Having back-up sleeves is an expensive proposition. If we are not set up for sleeves, or when there isn't enough time to order a new sleeve, or enough money to pay for a new roller, or when sleeves are just not an option, the ability to create barely visible seams and print the job using plates instead can be a real lifesaver.
Seams formed by plate butt joints often can be concealed in folds or cuts. If pressure-sensitive material is being used, seams may be positioned so that they are removed with the waste matrix in the stripping process after printing. Sometimes adding a "bump" bar of the same color in another station can help to mask a seam. Often, a customer will approve a faint line across the web as long as it is kept to a minimum. With these types of jobs, the key is in making the seam as close to invisible as possible.
Study the Image
With planning and careful cutting, barely visible seams can be achieved on a consistent basis. The product and print image should be studied to locate the joint in the least conspicuous place. Natural folds and seals are perfect hiding places for seams, and as mentioned above, some of or all of the seam can be removed during converting. The best location may not always be obvious, but spending some time on this step can save you costly art and plate revisions later on. It's time well spent.
The steps involved are basic and straightforward:
- Have the overall plate image area made exactly to the repeat length of the plate cylinder and distort according to cylinder diameter.
- Cut the plate using the techniques that follow, helping to ensure a clean joint where the ends of the plate meet.
Specifying Plate Length
When printing a continuous image with a regular flexo plate, a common practice is to make plate made longer than the cylinder repeat length and then custom fit the plate ends. However, while it may seem that cutting straight down through the two layers of plate where the ends overlap would ensure a tight seam (see Fig. 1), it actually results in the length being too long (see Fig. 2).
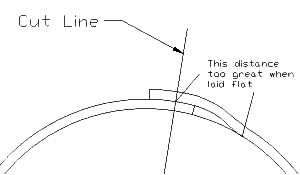
Figure 1
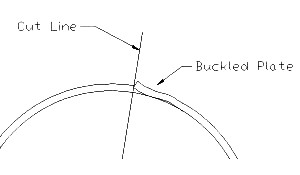
Figure 2
Therefore, the plate ends are usually custom-fit by overlapping them during mounting and "eye-balling" where to cut one or both plate ends. Even with the aid of a straightedge, making tight plate end seams on a cylinder is always tricky and often aggravating. Besides, the pressure required to cut through the plate often results in scoring of the cylinder surface.
With luck, and some skill, good results are possible this way. However, by the method outlined below, we precisely predict the plate's final length and use the cross-web (leading and trailing) edges of the printing surface as guides for cutting. Provided the plate cylinder diameter, plate thickness, distortion factor, and mounting tape thickness are appropriate for each other, the plate's print surface ends will meet precisely once cut and mounted on the cylinder. Additionally, cutting the plate on a flat, level cutting surface before mounting will yield straighter, cleaner cuts and less offensive seams.
Cutting the Plate
My preference for making these cuts is a single-edged razor with a safety holder, guided by a straightedge. The thin blade displaces very little material as it cuts, allowing greater cutting precision. Even minute imperfections in the cuts can diminish print quality. Therefore, it's important to be especially careful at this stage. Using a fresh blade insures the cleanest possible cut.
Plates should be cut on a hard, smooth surface, such as Formica or Plexiglas. Glass may be used, but caution must be exercised as the blade may slip during cutting, possibly causing plate damage or bodily injury. Placing a narrow strip (2"-3") of mounting tape directly underneath the complete length of the cut helps keep the plate from shifting while cutting, and also helps keep the blade's tip from slipping unexpectedly. A thin, flat, steel ruler serves as a good guide for the razor. Make sure that the straightedge rests flatly on the plate. Its edge should be aligned as precisely as possible with the edge of the print surface.
To help insure the tightest joint, the blade should be held at an angle, making a slight under-cut on each plate end. Try to cut exactly along the edge, where the print surface and the shoulder of the plate meet. If the cut is made perfectly vertical while the plate is flat, the ends may meet well at the surface and get crunched toward the plate floor. The plate backing may overlap, and you may end up ruining the seam trying to correct it. In addition, trying to cut vertically at the exact point where the shoulder meets the surface can cause the blade to slip down the slope of the shoulder, especially when the blade is not super sharp. The slight undercut builds in a little forgiveness to avoid overlap, while helping make a clean, first cut. (See Figures 3 & 4 below)
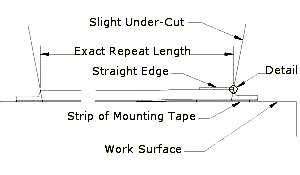
Figure 3 (detail area shown below)
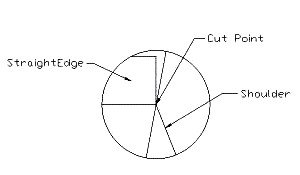
Figure 4 - Blow Up of Detail Area in Fig. 3
Be careful not to under-cut too much. The angle shown in the drawing is greater than I recommend, but shown to illustrate that there is an angle. With practice, you'll soon learn how to hold the blade. Also, use light-to-medium cutting pressure. If too much pressure is used, the plate can be distorted, introducing curves or defects. Even thin plates (.067"), when using the right amount of pressure, require two or more passes to cut through completely. Each subsequent cut must be made inside the first, with care taken to avoid making it jagged. Avoid lifting the razor while cutting. It may be helpful to practice with scrap plate material first, to develop a feel for cutting plates precisely.
Remember to follow safe cutting practices at all times:
- Avoid cutting towards any body parts: yours or your neighbor's!
- Use care when disposing of any sharp object (this includes razor blades, Exacto¨ blades, nails, etc.). Put them in a small, non-permeable container, such as a tin can, then label clearly and seal the container before throwing into the trash.
Once both ends of the plate are cut, mount the plate as usual. The plate ends should come together very nicely. If they don't, one or more of the preceding steps may not have been executed with sufficient precision, and/or one or more of the dimensional variables (plate thickness, distortion, etc.) may not be correct. Re-check all of your measurements, distortion factor, and cutting technique.
A challenge you may encounter during the actual printing of the job is that of ink, water, or solvent creeping under the plate, as there remains no edge to tape down or seal. The best defense is good adhesion between plate and mounting tape at the joint. The operator should keep an eye on the plate, re-mounting if necessary; to make sure it doesn't come up unexpectedly. With smaller diameter cylinders, plate lifting may be a problem. Wrapping the cylinders with low-density polyethylene film and allowing them to sit for a few hours can help plates stay down longer.
For some continuous print jobs, there is just no substitute for laser engraved rubber or photopolymer sleeves. They remain the best method for insuring seamless continuous images on a flexo press, outside of adding gravure stations. However, for instances where clean, tight seams can be concealed or removed during subsequent converting processes, the methods outlined here should help you make clean, precise butt-joints using flexo plates with increasing confidence and precision.