Plates are an essential part of the flexographic printing process. The plate delivers a precise amount of ink to the substrate exactly where it is needed. Such a critical piece of the printing process must be measured and controlled to deliver consistent results. Selecting the correct plate measurement tool and implementing plate QC is essential to success in the pressroom.
Let's take a look into what tools are needed for accurate platemaking:
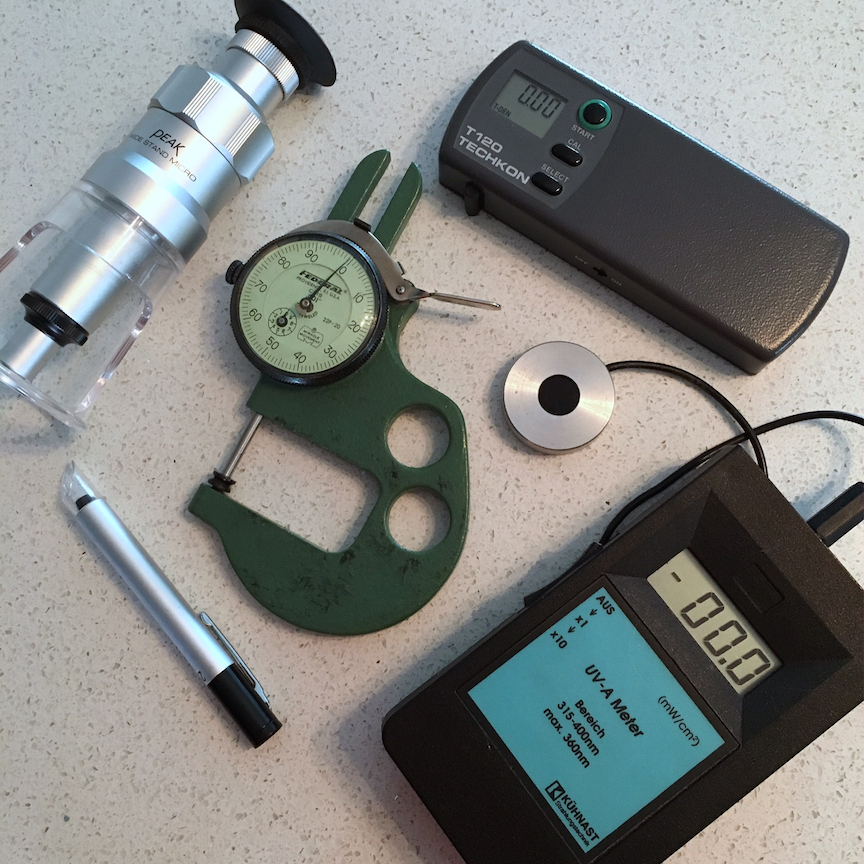
Plate Imaging QC Tools:
Transmission Densitometer: used to measure digital plate mask stain, analog film density, dot size on both digital mask and film. (ex: Techkon DENS)
100x Microscope: used to inspect laser focus test results, general image sharpness. (ex: Optical Stand Microscope)
Platemaking QC Tools:
Micrometer: used to measure plate gauge, relief depth, and check for plate swelling. (ex: Bench or Handheld Micrometer)
100x Microscope: used to visually check dot formation and fine image elements. (ex: Optical Stand Microscope or Digital USB Microscope)
Plate Measurement Device: used to measure screened dot size.
3D Plate Measurement Device: used to measure relief between dots, screened dot size, and quantify plate wear for used plates.
UVA Light Meter: used to measure exposure lamp intensity/lamp life. (ex: Kunhast UVA Meter)
What are the proper procedures for plate making quality control? How are these tools implemented in the plate room? APR's Tim Reece explains in the following information from his document, Photopolymer Platemaking Quality Control Procedures:
Using a B/W Transmissive Densitometer check Dmax and Dmin
Digital Platemaking
Inspect mask for scratches or pinholes
Using a B/W Transmissive Densitometer perform a stain test once a month or with every new batch, as well as a focus test.
SECOND QC CHECK
Tool: Micrometer
Using a micrometer, measure and record raw material thickness of the sheet photopolymer
THIRD QC CHECK
Visual Check
Conventional Analog Platemaking
Verify the film negative is wrong reading on the emulsion side of the film negative for reverse print. Verify the film negative is right reading on the emulsion side of the film negative for surface print. Clean film negative and vacuum coversheet of all debris.
(Digital Platemaking)
Verify the black mask (face up) is wrong reading for surface print. Verify the black mask (face up) is right reading for reverse print. Clean plate surface of all debris prior to main exposure.
FOURTH QC CHECK
Tool: Micrometer
After the drying stage is complete, once again measure the plate thickness (micrometer) to insure the material is completely dry before moving on to post exposure and light finishing (detack). The plate should be swollen .0015” or less. At this point if “tiger stripes” are apparent, clean them off prior to post exposure and detach.
FIFTH QC CHECK
Tool: Micrometer
Once the plate is finished verify that correct relief has been established using a micrometer.
Example (.067 material); Line copy – relief .023” - .025”
Example (.067 material); Screen copy – relief .020” - .022”
SIXTH QC CHECK
Visual Check
Perform a paper test to ensure the plate has been adequately detacked (a sheet of paper should release easily from the print surface).
Bend plate to ensure the plate has no cracking as a result of over exposing to UV-C.
In addition to the procedures above, printers controlling process color will also benefit from measuring dot size on the finished plate. A control patch should be placed on each sheet of photopolymer coming out of the plateroom so that the dot size can be checked and recorded to prevent any possible exposure or curve issues from making it to press. The target must contain known dot sizes, at least a 100%, 50%, and highlight. Both the ablated mask and the finished plate can be measured using a plate measuring device to confirm the platemaking conditions are correct. The image below is an example of this type of plate control target. (Click to enlarge.)
With a little training and the right quality control procedures in place, platemaking can be a reliable, predictable, and fully controllable part of your printing process. If you have any questions about the contents of this article or flexographic platemaking, contact Catherine Green of APR's Technical Solutions Group at [email protected].

Thank you