
Dirty Print
Introduction
Dirty print is a bothersome printing defect that stems from a wide array of potential causes. From the pressroom to prepress and platemaking, there are many factors that may contribute to this defect. As higher printing resolutions are demanded of flexographic printers, it is imperative that the process itself is capable of handling the demand to reduce the risk of dirty printing. In this article, we will explore some common causes and remedies for dirty printing.
Example of Dirty Print
Anilox Roll Selection
Selecting the proper anilox can be key in reducing dirty print in many situations. Most anilox roll manufacturers will recommend running an anilox roll with an LPI at least 5 times the printing LPI. This will prevent the smallest printing dots on the plate from being able to enter the anilox cell openings, avoiding "dot dipping" - a printing defect where small highlight dots dip into the anilox cells, collecting ink on the surface and shoulder of the dot (fig.1). This excess ink can transfer to the substrate causing excessive highlight gain and/or dot bridging, and also promote ink to further collect in the screened area on the plate.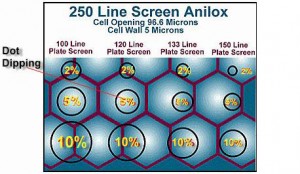
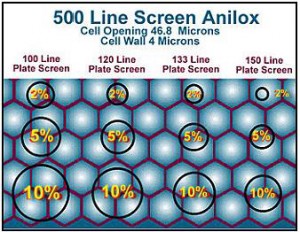
fig.1 (illustration courtesy of Harper Corporation of America)
Also, selecting an anilox roll with the appropriate LPI and volume for your specific application will prevent excess ink from being delivered to the plate and substrate, minimizing the chances for dirty print related to the anilox roll. The best way to optimize and gain knowledge about your specific condition is to perform a banded anilox test. This test utilizes a specially engraved anilox roll with multiple LPI and volume settings, allowing multiple conditions to be tested simultaneously on a single print deck (fig.2).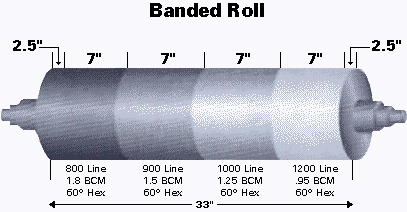
fig.2 (illustration courtesy of Harper Corporation of America)
The Printing Plate
Proper image formation on the plate is key to maintaining clean, sharp graphic reproduction on press. This is especially important for highlight dots and fine type, which can be susceptible to instability and incomplete formation if the platemaking conditions are not properly optimized. For screened highlight dots and small details to properly form and hold on the plate, it is imperative that the proper back exposure time is used to obtain a relief depth that is appropriate for the type of work being printed (fig.3). This will ensure that, with the proper face exposure, the dots have a stable base to prevent them from folding over under pressure. If this happens, the shoulder of the dot will print instead of the top, causing dirty print and massive gain in critical highlight areas.| Plate Thickness | Recommended Relief Depth (high detail/process) | Recommended Relief Depth (low detail/line) |
| 0.030" (0.76mm) 0.045" (1.14mm) | 0.021" | 0.025" |
| 0.067" (1.70mm) | 0.023" | 0.027" |
| 0.100" (2.54mm) 0.112" (2.84mm) - and up - | 0.030" | 0.045" |
fig.3
Ink pH and Viscosity
Dirty printing is a common side effect when pH and viscosity are not carefully controlled with water-based inks (viscosity only with solvent-based inks). The viscosity of the ink can greatly affect the ink release from both the anilox roll and the plate. When ink becomes too viscous (too thick) it can load up more easily onto the plate, causing dot bridging and fill-in of fine type. Also, when the plate picks up a heavier ink film, it can cause higher than normal densities, trapping issues, and potentially slow drying. The order in which the pH and viscosity are checked is also vital to success. pH must be adjusted prior to viscosity, as changing the pH will always change the viscosity, but changing the viscosity can be done without effecting pH (only use additives recommended by the ink manufacturer).Ink Drying
The dryers could easily be one of the most commonly overlooked areas on the press. They play a huge role in the printability of inks and even plates. If not carefully controlled and inspected, the dryers can become out of balance, causing ink to dry on the plates or to not dry properly between stations, both causing dirty print defects. Ambient temperature and humidity also affect the printing inks. For example, with water based inks, the amines can begin to evaporate more quickly at temperatures around 85 degrees Fahrenheit, causing the ink to become less viscous, dry poorly, and potentially build up around the doctor blades. It is best to maintain the pressroom near 72 degrees Fahrenheit and 50% humidity if possible, to reduce the risk of climate related dirty printing.Dust and Web Contaminants
Keeping dust levels low in the pressroom and plate room can be a tricky task. With so many pieces of equipment cutting paper and creating static electricity, fighting dust can be an ongoing battle. The defects caused by these contaminants can be anything from small voids in solid areas where particles blocked the ink transfer onto the substrate, to a plate loading up with ink and printing dirty due to picking up excessive lint and dust. Controlling lint and dust in the pressroom should begin with the ventilation system. Enough air should circulate to keep the majority of the dust at bay. If this is not the case, specialty systems can be placed to help with dust removal and air cleaning (for example, the Duster 2000). Also, web cleaners can remove contaminates as the web enters the press, before the lint and dust has a chance to contact the printing plate. The best answer is a combination of these solutions to minimize dust as a potential contributor to dirty print.A Note About How Prepress Graphics Can Contribute To Dirty Print...
Catherine Haynes, APR Southeast Technical Manager Printers are continuously being challenged by their competitors and customers to achieve finer vignettes that can fade to 0% and print ever-higher line screens, and our industry has made great strides to do so. Vendors have devised a variety of solutions to make this possible – presses that print with much tighter tolerances, prepress software and equipment solutions that maximize the graphics potential and plate making options that allow us to take advantage of both digital and flat top dot benefits just to name a few. However, smaller dots and finer vignettes also make all the previous contributors to dirty print mentioned earlier even more challenging. It is also important to note that the graphics themselves, if not managed correctly, can translate into what appears as dirty print. A good example of this is when the highlight portion of a vignette does not fade properly resulting in random or isolated dots that are not properly supported and thus print "dirty". A similar effect can be seen in highlight areas of images where "scum dots" appear or hard edges are formed. Fortunately there are processes, tools and screening solutions available to minimize the effects – the key is optimization.Understanding Common Flexo Print Defects — Part 2 — Dirty Print
Understanding Common Flexo Print Defects — Part 3 — Ink Spitting